

{%- assign variant = product.selected_or_first_available_variant -%}

{%- if customer.b2b? -%}
  <table class="volume-pricing">
    {%- for brk in variant.quantity_price_breaks -%}
      <tr><th>{{ brk.minimum_quantity }}+</th>
          <td>{{ brk.price | money }}</td></tr>
    {%- endfor -%}
  </table>
{%- endif -%}Shopify B2B Without Plus: The Complete Setup, Step by Step
Short answer: As of April 2, 2026, Shopify’s native B2B features are available at no extra cost on Basic, Grow and Advanced, not just on Plus. You get company profiles, up to three active catalogs, quantity rules, volume pricing, payment terms and vaulted credit cards. The real difference from Plus is not in the feature list, it is in the assignment: without Plus, a catalog attaches to a B2B market, not directly to a company. Anyone who does not know this ends up hunting the company form for a field that will never appear there.
For nearly four years native B2B was the main reason D2C brands with wholesale inquiries either reached for an app or let the whole thing go. That wall is gone. What comes next is the less glamorous question: how do you set this up cleanly without breaking the retail store you already have. At Shopatch we build Shopify themes and stores. Three things reliably cost time here: the switch to new customer accounts, the catalog assignment running through a market, and a number field that overwrites itself. All three are below.
What did Shopify actually unlock on April 2, 2026?
Shopify extended the core B2B features from Plus to the Basic, Grow and Advanced plans, at no additional cost. On every paid plan you now get:
- Companies and company locations with several contacts per location
- Location-level permissions, either “location admin” or “ordering only”
- Up to three active catalogs across all B2B markets
- Quantity rules (minimum, maximum, increment) and volume pricing
- Net payment terms with payment reminders, ACH (US only) and vaulted credit cards
- Draft order to invoice, checkout to draft, easy reorders, PO numbers
- Sales staff permissions
- The Trade theme, the quick order list, and Shopify Flow automations using B2B objects
This is not a stripped-down starter tier. For a wholesaler with a handful of price groups, everything needed is there.
What can Plus do that the smaller plans cannot?
Four things stay Plus-only, and a fifth already starts at Advanced:
| Basic, Grow, Advanced | Plus | |
|---|---|---|
| Active catalogs | 3 | unlimited |
| Catalog assigned directly to a company or location | no | yes |
| Deposits and partial payments | no | yes |
| Payment request per fulfillment | no | yes |
| Contextual checkout and storefront via Markets | Advanced and up | yes |
Row two is the one that matters. On Plus you open a company, pick a catalog, done. Without Plus that path does not exist: you assign the catalog to a B2B market, and company locations belong to that market. It sounds like a detail, but it changes how you slice your customer base in the first place. You stop thinking in individual customers and start thinking in price groups, and you get exactly three of them.
Three catalogs cover most models: dealer, distributor, key account. They do not cover giving every customer their individually negotiated price. That is the honest limit, and it is also the point where Plus starts paying for itself again.
What do you need to settle before you start?
Three prerequisites you would rather know up front than halfway through.
New customer accounts are mandatory. B2B runs exclusively on modern customer accounts (sign-in by email and one-time code, no password). Legacy accounts do not work. If you run a blended store, that switch affects your retail customers too, not only your business buyers. Plan it as its own step with its own announcement, not as a side effect.
Parts of checkout drop away for B2B. Not available:
- accelerated payment methods: Shop Pay, Apple Pay, Google Pay, Amazon Pay
- local delivery and pickup points, except through a draft order
- tipping
- subscription products
- agentic storefronts
checkout.liquidcustomizations- some third-party apps
Four more need Shopify Support to switch them on for you: pickup in store, line item scripts, abandoned checkout tracking, and gift cards at checkout.
There are hard ceilings. An order holds at most 500 line items, a draft order at most 200. A company location can carry at most 25 catalogs. And platform fees differ between B2B and D2C orders, which belongs in your margin math.
Decide the basic shape as well: a blended store for retail and business buyers, or a dedicated B2B store. Both work, but blended means every theme change has to serve two audiences. For a dedicated B2B store you do not need an app: under Online Store, Preferences there is a Restrict access to B2B customers only option that puts the whole storefront behind the customer login.
How do you create a company?
Under Customers, Companies, Add company. The company is the container, the location beneath it is the unit that actually buys.
- Enter the company name. The form says it plainly underneath: this will appear in customer accounts and at checkout. So write it the way the customer refers to themselves.
- Set a company ID. Use the number from your ERP or accounting system and you save yourself the manual reconciliation later.
- Set a main contact. Either link an existing customer through the search field, or add a new one right there with first name, last name and email. The email is required, because that is what the buyer signs in with.
- On the location below: shipping and billing address, a location ID, the payment terms and the tax rule.
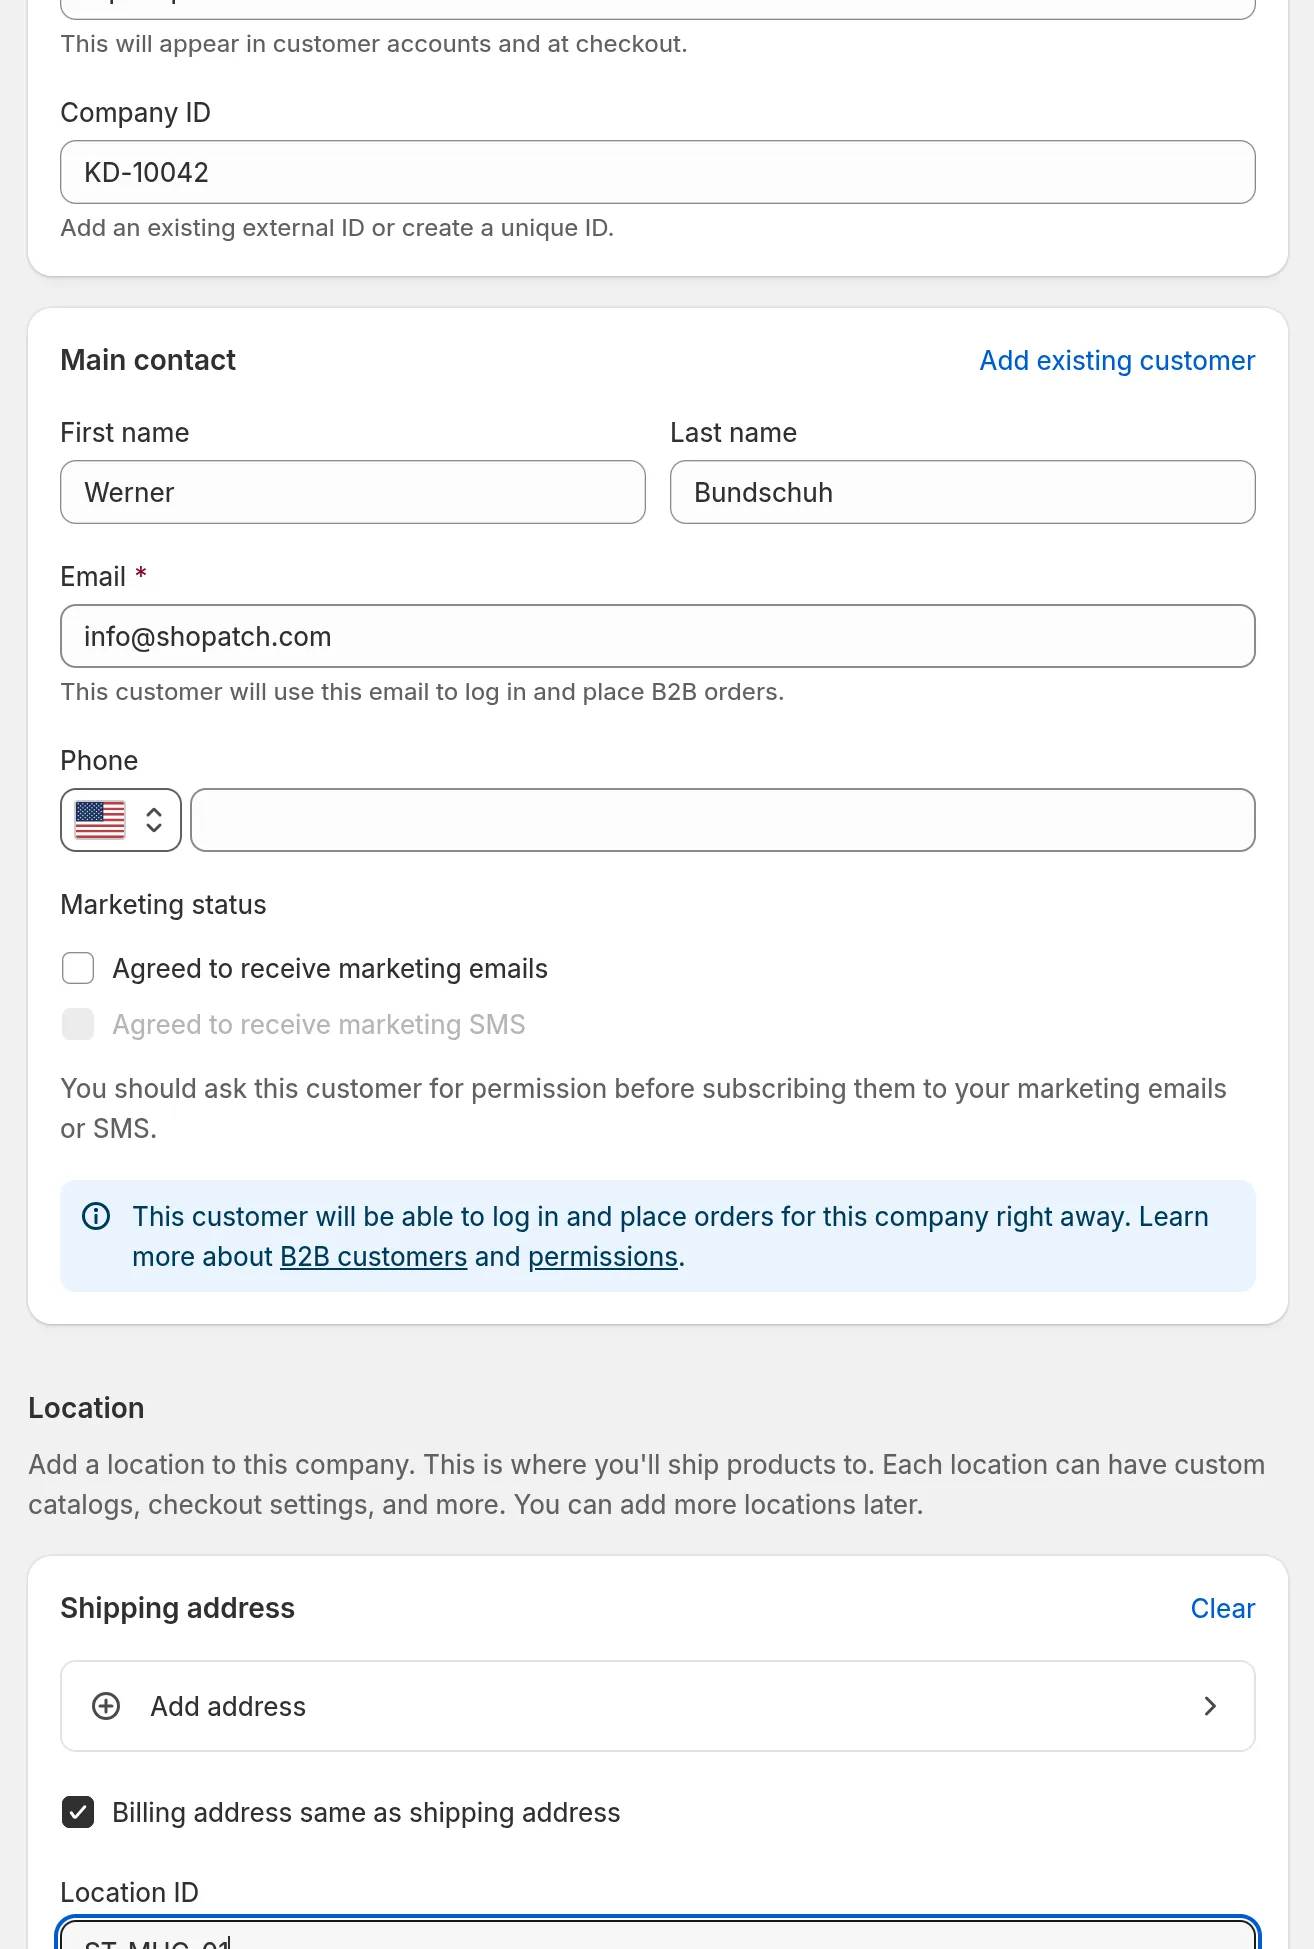
The location is where the interesting settings live. Permissions come in two levels:
- Ordering only: can purchase and see their own orders
- Location admin: can purchase, see all orders for that location, and update addresses
Payment terms are a fixed list: none, due on fulfillment, or net 7, 15, 30, 45, 60 and 90. For tax, the options are collect tax, collect tax unless exemptions apply, and don’t collect tax. Both live on the location, not on the company. For a customer with locations in several countries that is exactly right, but it costs you a deliberate look at every single location.
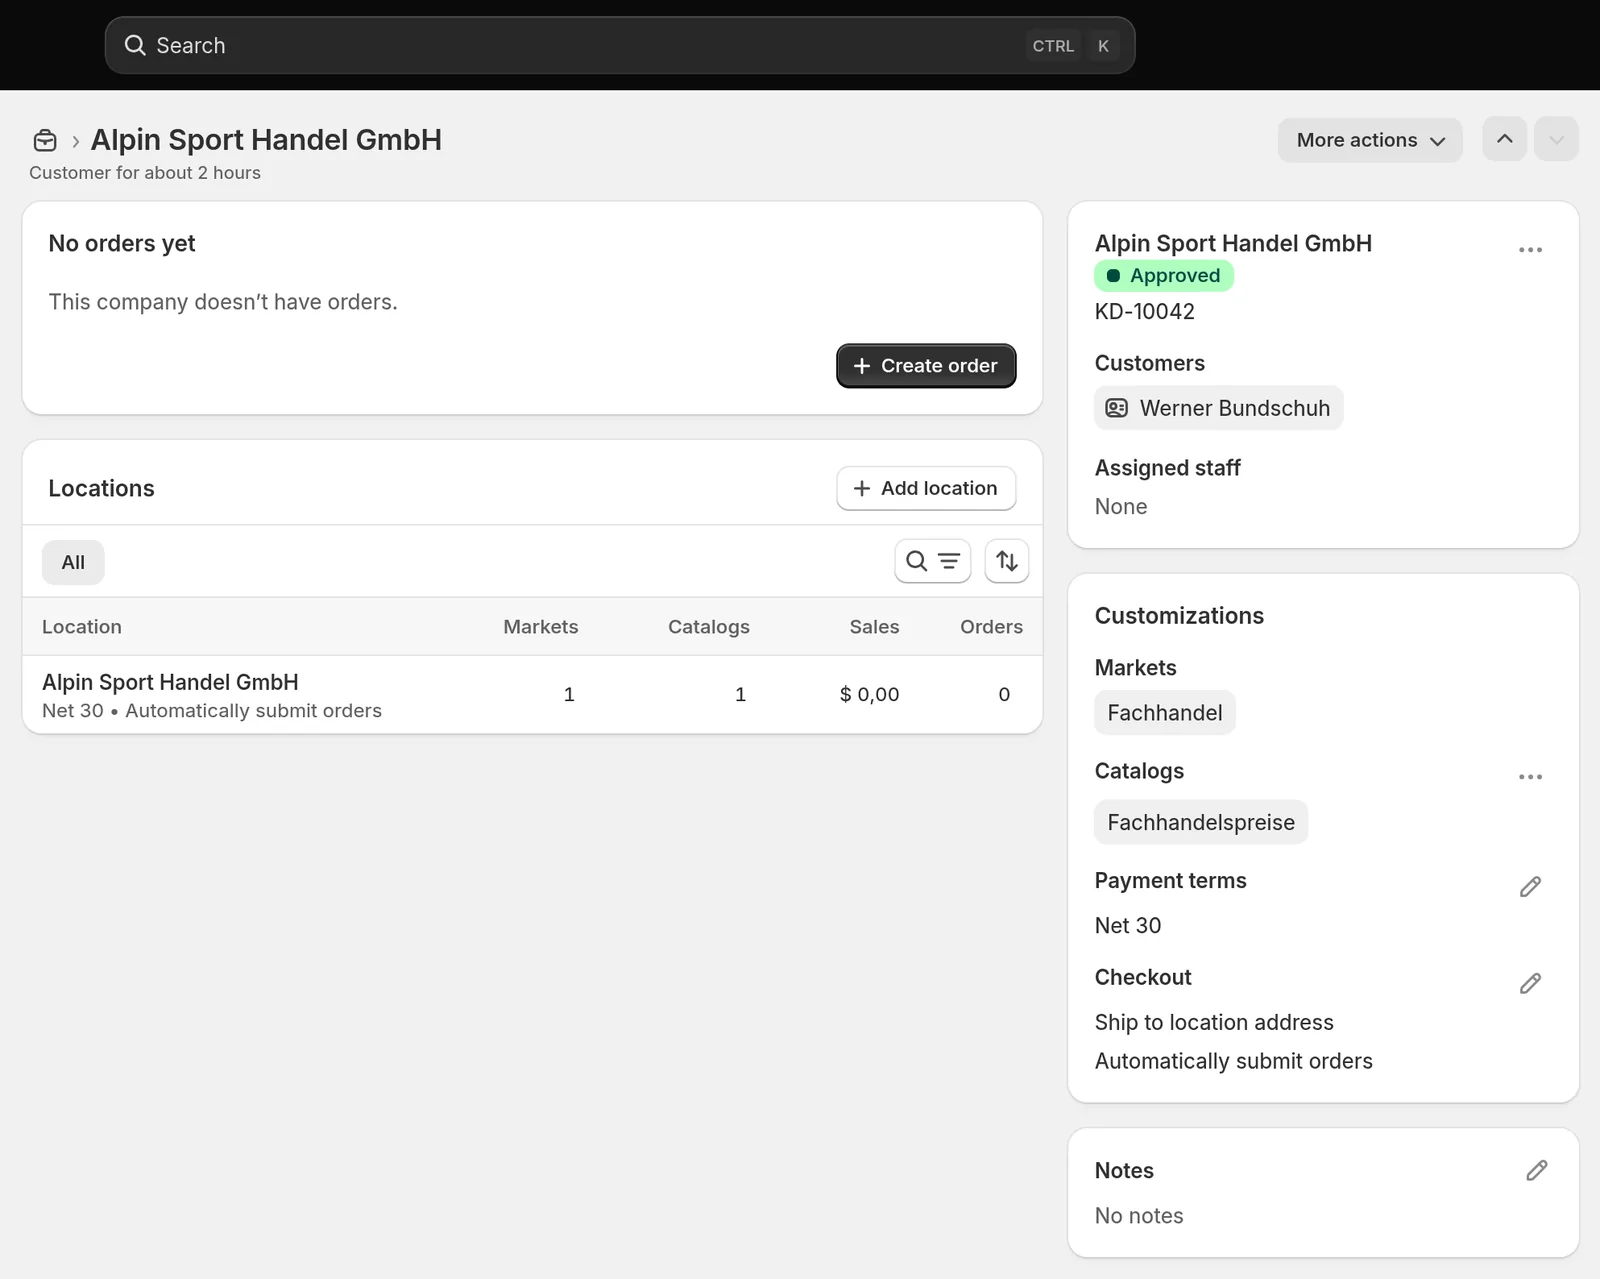
How do you get customer-specific pricing without Plus?
Through a catalog that you assign to a B2B market. Two steps, and the first one surprises most people.
A B2B market is not a separate market type. In the current Markets model it is an ordinary market whose condition points at company locations. Under Markets, Create market you give it a name and click Add condition. In the dialog the condition type starts on regions, and you switch it to Company locations. The four condition types are regions, POS locations, company locations and channels.
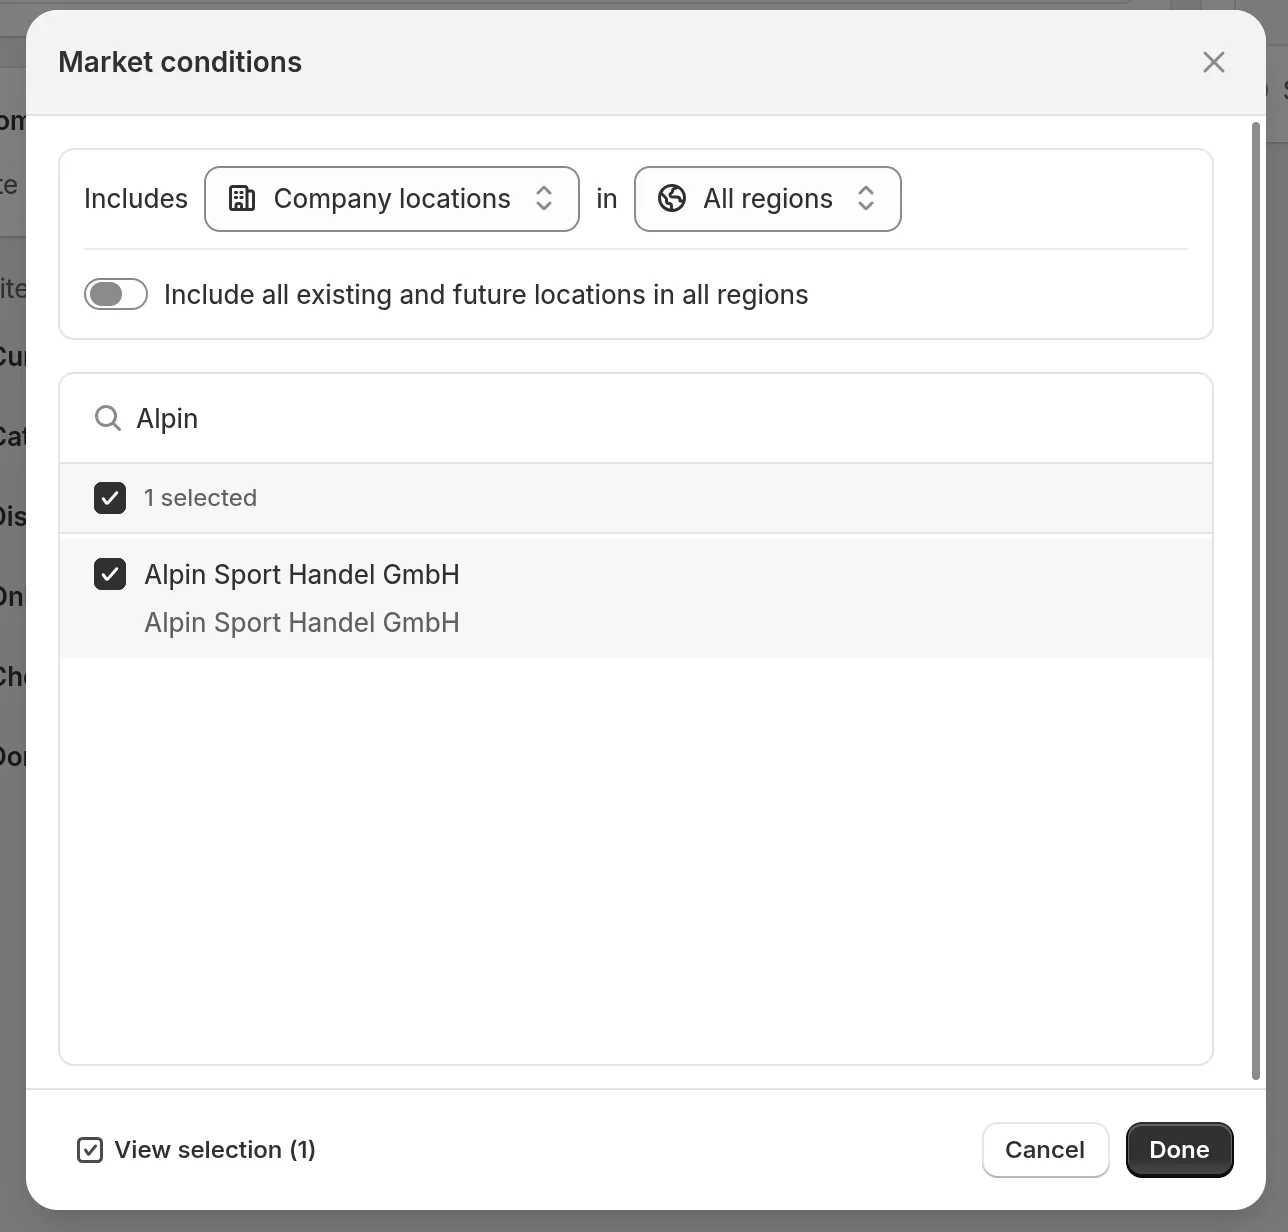
The toggle “Include all existing and future locations in all regions” is the convenient option when you run a single dealer price level. As soon as you want two price groups, leave it off and pick locations per market.
Then the catalog. Under Markets, Catalogs, creating a catalog puts everything on one page:
- Give it a title. It is internal, customers never see it.
- Leave the status next to it on Active. A draft catalog has no effect.
- Under pricing, set the price adjustment: a percentage plus a Decrease or Increase selector. Next to it, the Include compare-at price toggle decides whether the adjustment also applies to the compare-at price.
- Under products, type fixed prices into the rows where the percentage does not fit.
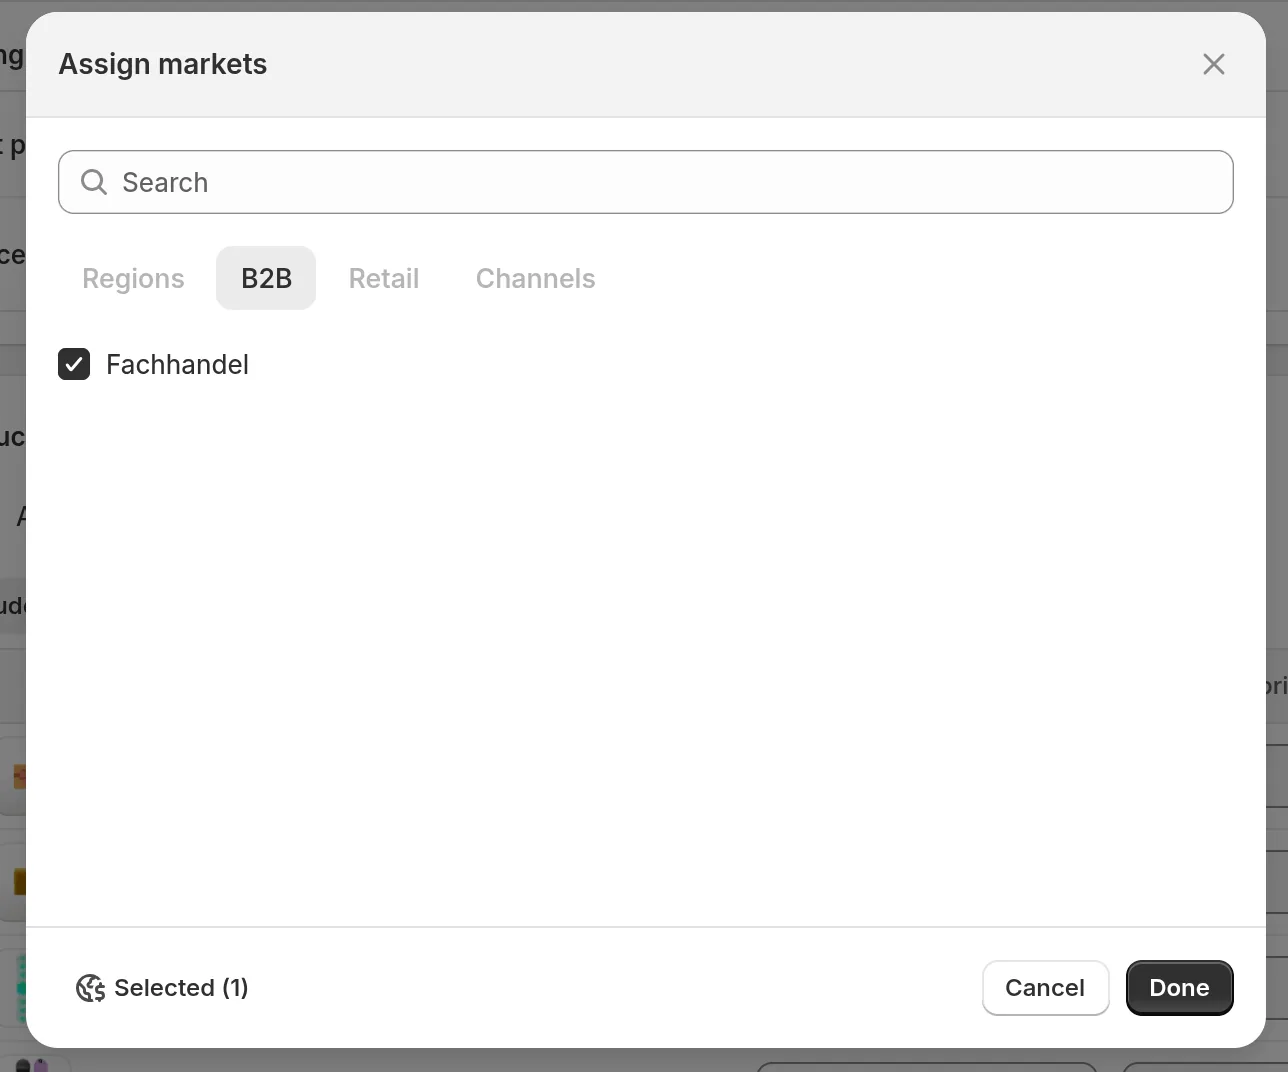
- In the markets field at the top, add the B2B market.
The picker is called Assign markets and carries four tabs: Regions, B2B, Retail and Channels. It opens on Regions, and the B2B market sits behind B2B. Miss that and you will hunt for your freshly created market in a list it was never in.
You have two pricing tools, and they combine:
- the price adjustment as a percentage across the whole catalog
- fixed prices per product or per variant
The precedence matters: fixed prices override the percentage adjustment. So the usual build is a percentage adjustment as the floor across the whole catalog, plus a handful of fixed prices for the items that are costed differently.
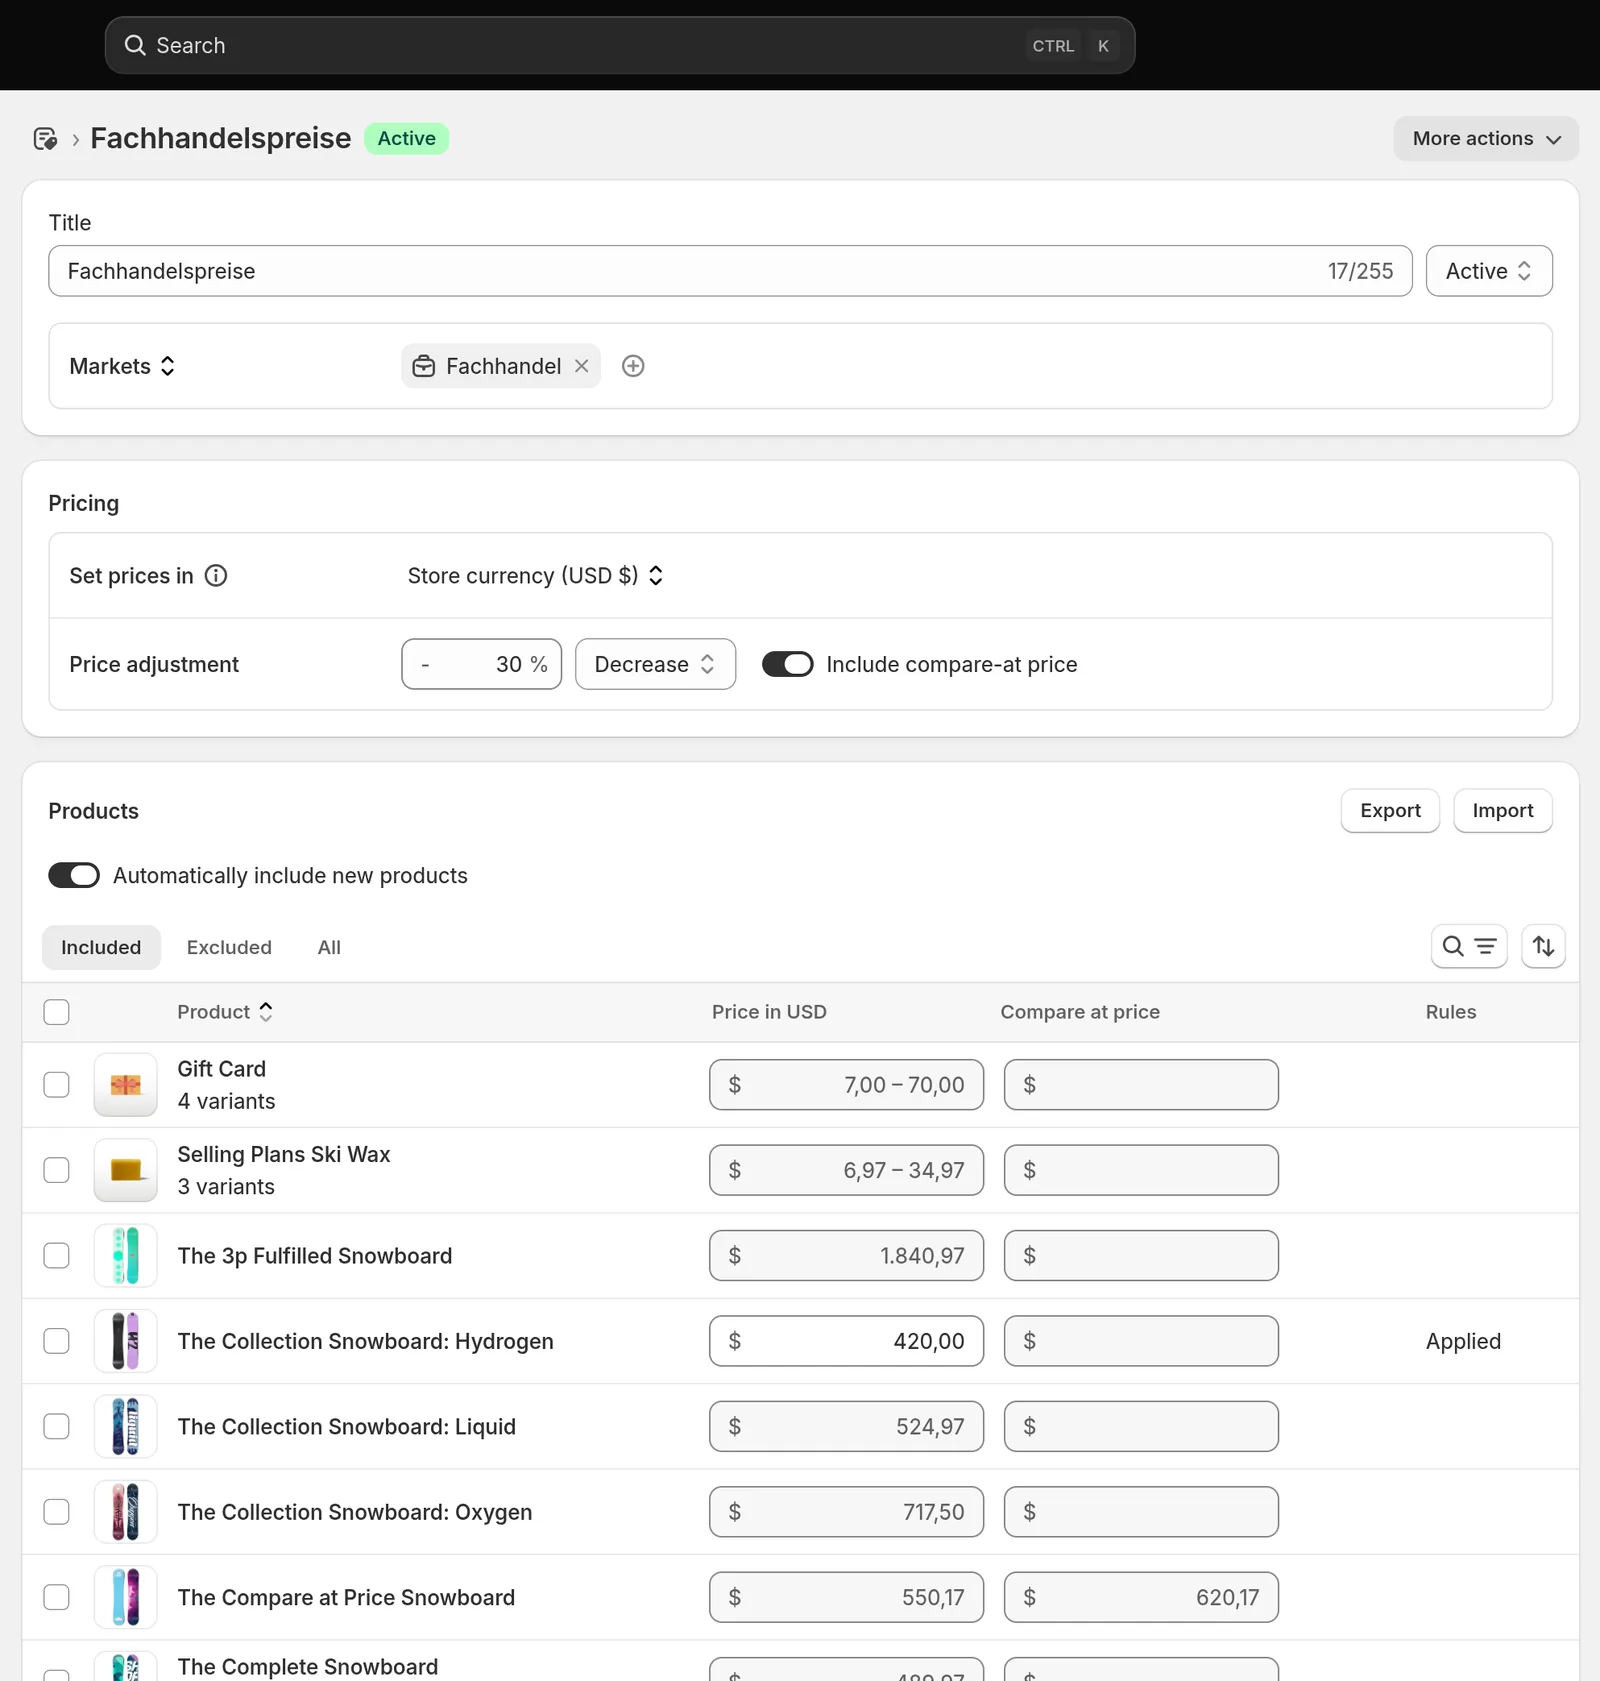
A note on the documentation: the Shopify Help Center still describes an older wizard here, with an “all products or specific products” step followed by Continue. The admin has moved to the single page above. When a walkthrough does not match what you see, that is usually why.
When a location carries several catalogs, three rules apply: products from all catalogs are merged, on duplicate products the lowest price wins, and volume pricing comes from the catalog with the lowest price. Sensible, but it also means a forgotten catalog from an old promotion can quietly undercut your pricing. Set catalogs you no longer need to inactive rather than leaving them lying around. With three active catalogs allowed, you notice fast.
How do you set quantity rules and volume pricing?
Both live in the catalog, not on the product, and both sit behind the same button. Open the catalog, hover the product row, and click the small icon in the Rules column on the right. One dialog covers Quantity rules and Volume pricing together.
The quantity rules are three fields:
- Increment: the step size, for example 6 for a six-pack
- Minimum: the smallest order quantity
- Maximum: the largest quantity per order
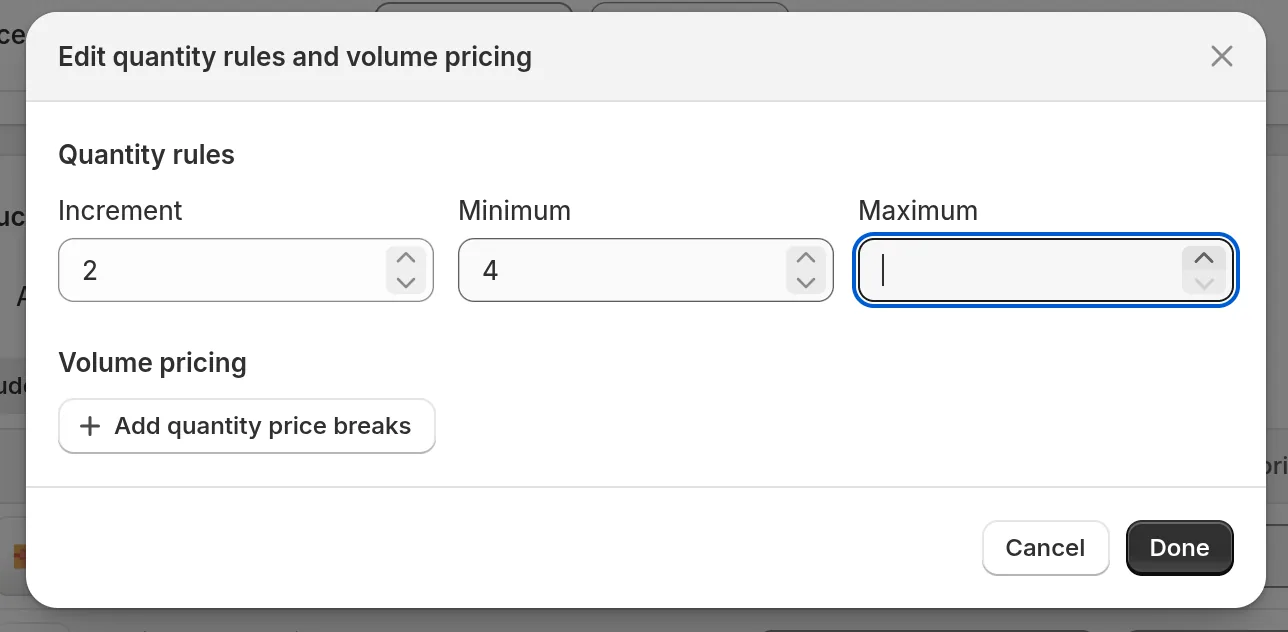
A snag no documentation mentions, and one that costs real time during setup: Shopify auto-corrects the minimum to a multiple of the increment. Set the increment and then immediately type into the minimum, and the auto-correction can collide with your keystrokes. A 4 quietly becomes a 24. Set the increment first, pause, and read the minimum back after saving.
Volume pricing goes underneath, in a small table. The first click is Add quantity price breaks, every further tier is Add break. The first row is fixed to your minimum quantity and carries the catalog price; every row below it is a break with its own quantity and price.
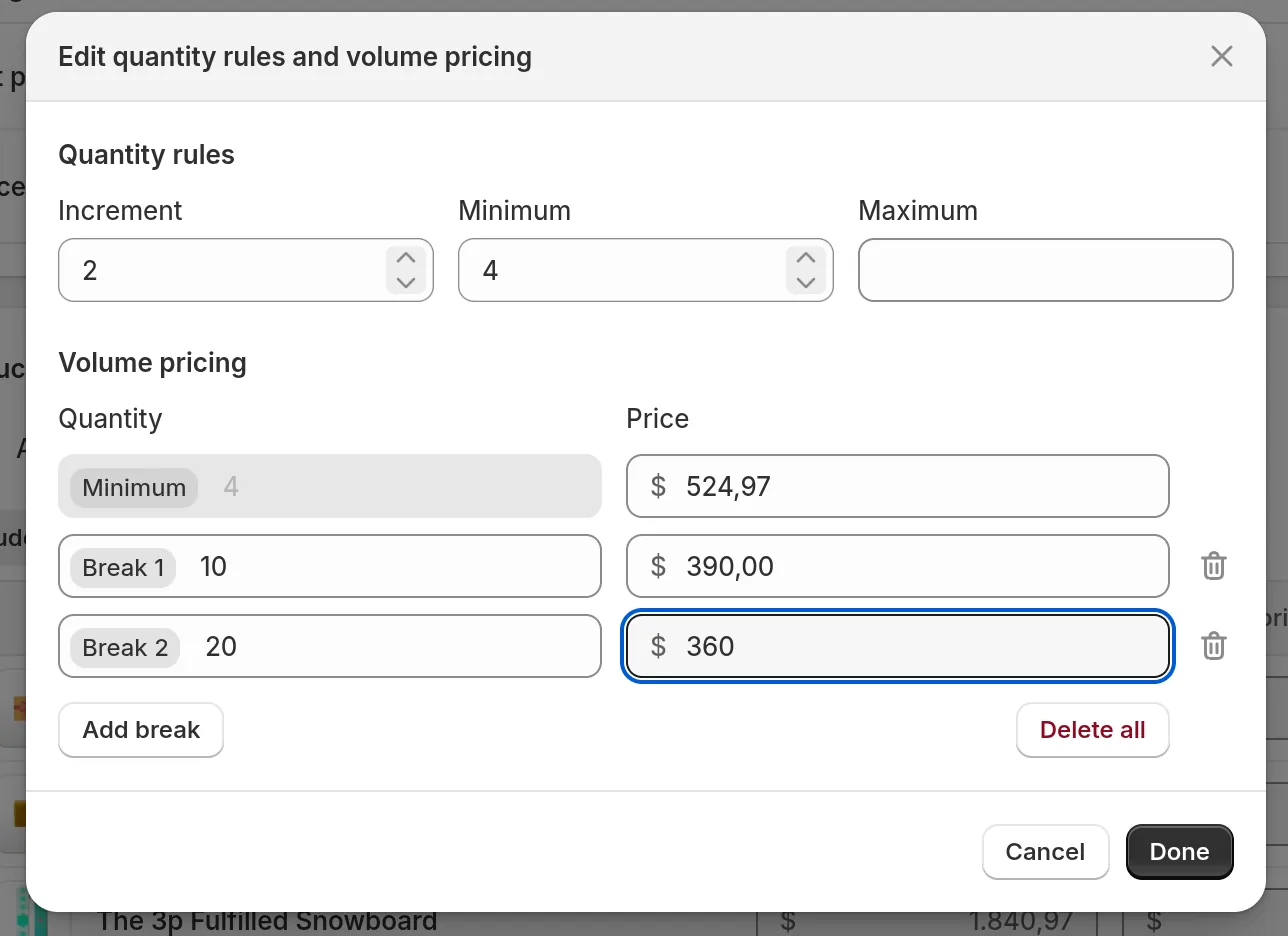
One rule is strict: a price break quantity must be greater than the minimum order quantity and a multiple of the increment. If the dialog refuses to save, that is almost always why.
Why does your theme not show the volume pricing?
Because the pricing rules live in the catalog and the display is the theme’s job. The separation is deliberate, and if you do not know about it you will build a perfect price ladder and then wonder why the product page shows a single price.
The free Shopify themes ship this from certain versions on: quantity rules from version 8.0.0, volume pricing and quick order list from version 11.0.0. For a dedicated B2B store, Trade is the theme built for it and Horizon is B2B-compatible. Here is what that looks like when it lines up, the same setup seen from the front:
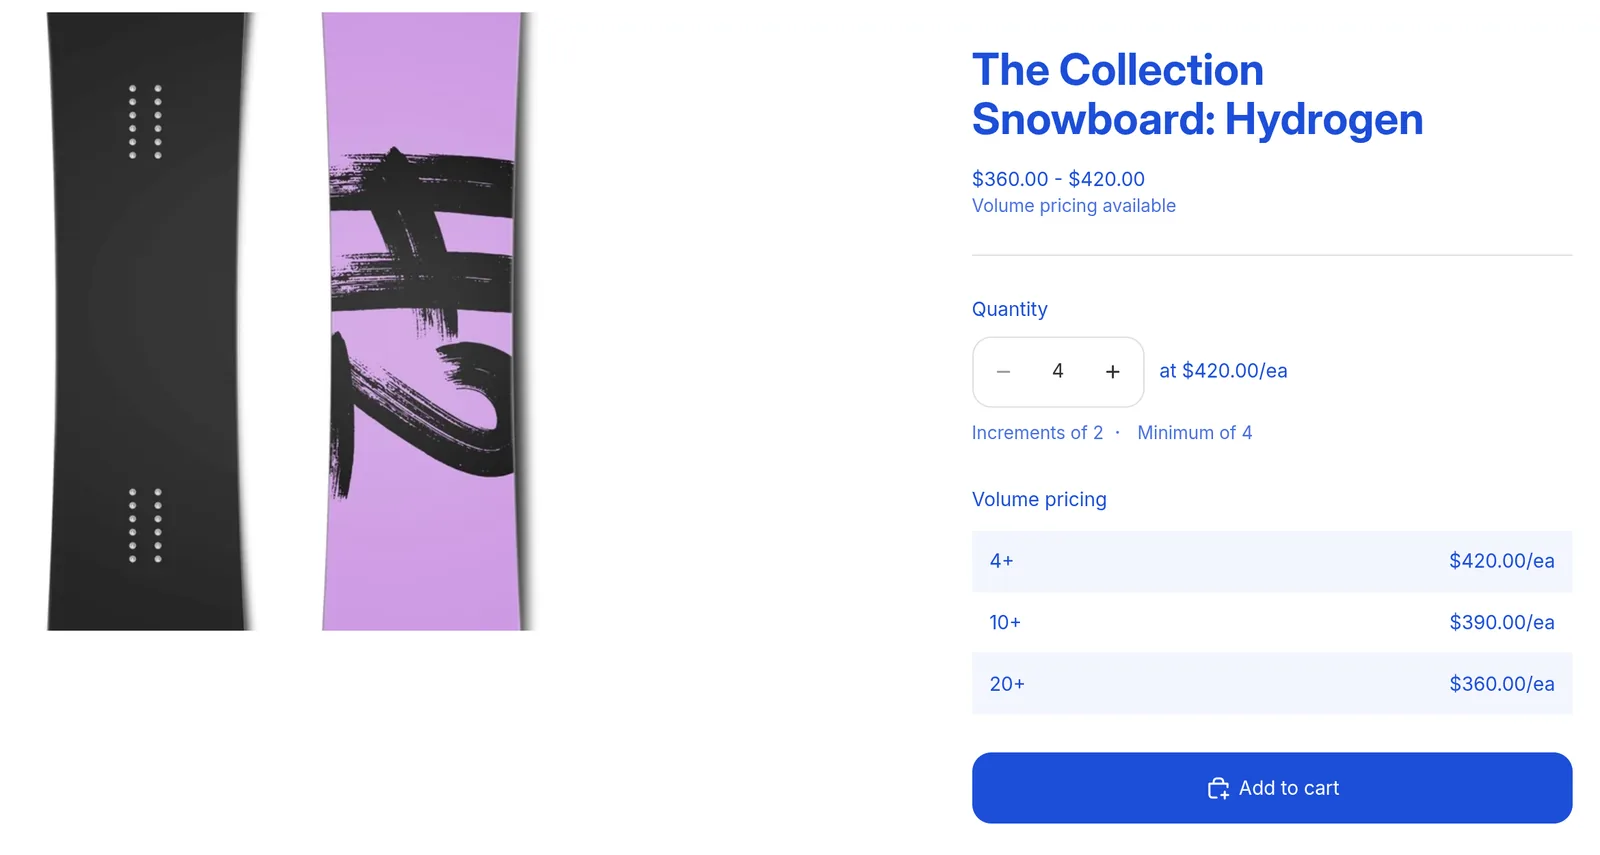
If your theme is older or custom, none of this comes for free and you build it yourself. That is manageable.
The quantity rule hangs off the variant:
{%- assign variant = product.selected_or_first_available_variant -%}
{%- assign rule = variant.quantity_rule -%}

{%- if rule.min > 1 or rule.increment > 1 or rule.max != blank -%}
  <ul class="qty-rule">
    {%- if rule.min > 1 -%}
      <li>Minimum order: {{ rule.min }}</li>
    {%- endif -%}
    {%- if rule.increment > 1 -%}
      <li>Sold in multiples of {{ rule.increment }}</li>
    {%- endif -%}
    {%- if rule.max != blank -%}
      <li>Maximum {{ rule.max }} per order</li>
    {%- endif -%}
  </ul>
{%- endif -%}
Volume pricing is the same, with a guard in front so the table never renders for retail customers:
{%- assign variant = product.selected_or_first_available_variant -%}
{%- assign rule = variant.quantity_rule -%}

{%- if product.quantity_price_breaks_configured? -%}
  <table class="volume-pricing">
    <caption>Volume pricing</caption>
    <tbody>
      <tr>
        <th scope="row">{{ rule.min }}+</th>
        <td>{{ variant.price | money }}</td>
      </tr>
      {%- for brk in variant.quantity_price_breaks -%}
        <tr>
          <th scope="row">{{ brk.minimum_quantity }}+</th>
          <td>{{ brk.price | money }}</td>
        </tr>
      {%- endfor -%}
    </tbody>
  </table>
{%- endif -%}
Two things that cost you time if you have not met them. First: if you swap variants with JavaScript, you have to re-render this block through the Section Rendering API, otherwise it keeps showing the first variant’s values. Second: when testing in a preview theme you only see the values while genuinely signed in as a B2B customer. An empty block is usually not a code bug, it is a missing sign-in.
For a blended store there is a clean switch, plus a location picker for customers who buy for several locations:
{%- if customer.b2b? -%}
  <p class="b2b-note">
    Pricing for {{ customer.current_company.name }},
    location {{ customer.current_location.name }}
  </p>

  {%- if customer.company_available_locations_count > 1 -%}
    <ul class="location-switch">
      {%- for location in customer.company_available_locations -%}
        <li><a href="{{ location.url_to_set_as_current }}">{{ location.name }}</a></li>
      {%- endfor -%}
    </ul>
  {%- endif -%}
{%- endif -%}
customer.b2b? is the switch for the whole blended store. Use it to surface wholesale notes, minimum quantities and the quick order list for business buyers, without a retail customer ever seeing any of it.
How do you hide products from retail customers?
Through publishing, not through an app. Open the product, go to the Publishing section and into its detail view:
- Publish to the online store.
- Unpublish from all region catalogs.
- Publish to the B2B catalogs you want.
After that the product is invisible to retail customers but visible to signed-in business buyers with the matching catalog. That is how you handle case packs, display units or dealer-only lines without running a second store.
How do you test before real customers arrive?
With a test company, all the way through to a real order. Create a company with one location and one contact on an email address you control, assign the catalog to the B2B market, and then walk the whole path as the customer:
- sign-in with the one-time code
- product page: do catalog price, minimum quantity and volume pricing all apply
- cart: does the ladder recalculate when you push the quantity past a break
- checkout: do the payment terms appear, does the tax rule apply
- order confirmation and invoice
The reason for that thoroughness is not caution, it is the failure mode. A misconfigured B2B setup does not throw an error, it shows a wrong price. And a wrong price only surfaces once somebody has paid it.
When is Plus still worth it?
At three points, and all three are easy to spot:
- You need more than three price groups. As soon as you carry individually negotiated pricing per customer, the catalog ceiling is the bottleneck, not convenience.
- You need deposits or partial payments. With pre-production, made-to-order or long lead times there is no way around it.
- You ship in partial deliveries and want to bill per shipment. Payment requests per fulfillment exist on Plus only.
As long as none of those three apply, the question is settled: the plan you already have can do wholesale.
Summary
The whole path in five steps:
- Switch to new customer accounts and decide between a blended or dedicated B2B store.
- Create the company under Customers, Companies, with its location, permissions, payment terms and tax rule.
- Under Markets, create a market whose condition is company locations. That market is your B2B market.
- Under Markets, Catalogs, create the catalog, set the price adjustment, set it active, and attach it to the B2B market. Without Plus, that is the only assignment there is.
- Extend the theme: quantity rules, volume pricing, quick order list, and
customer.b2b?as the switch.
The features cost nothing extra. The work behind them is the modelling: how many price groups do you really have, and do they fit into three catalogs. Once you have answered that, the rest is clicking.
If your theme will not play along, or you want the wholesale side fitted cleanly into an existing store without diluting the retail experience, get in touch. That is exactly what we build.